|
How to use our SQUID proxy
Posted by Max Biggavelli on 25 March 2013 05:55
|
|
|
Since March 2013 every Member has a so called SQUID proxy included in his Account and is free to use if desired. To explain what a SQUID proxy is and what it is good below a little overview first.
You can even chain another VPN: "other VPN service using OpenVPN => nVPN SQUID" Despite mainly being used as a caching HTTP proxy solution, SQUID furthermore includes support for several other protocols, including FTP(Passive mode only), SSL, TLS, HTTPS and Gopher. The SQUID config is (as always) focused to operate in a high anonymity, or so called "Elite" mode, so it not only replaces your IP address with the IP addressfur of your assigned Country, but furthermore manipulates the typical "X_Forwarded_For" and "HTTP_VIA" headers, making it impossible to say for whom the proxy actually forwards the data for, or that you are actually using a proxy at all. Some Users even when using TCP/443 are still facing restrictions or being unable to browse reliable with OpenVPN, meanwhile the SQUID proxy for straight browsing or simple downloading activities, can be a real good alternative!
[+] Simple and quick setup in any Browser, jDownloader or every other Software which is conform to PROXY usage (OpenVPN installation is not necessary) [+] Fast speed (no Encrypted Traffic!!) [+] For a quick IP change only [+] Good for just downloading from OCH (One Click Hosters like Rapidshare and so on) [+] Good for restricted environments like China, Offices, School (Places where even a TCP/443 method doesnt work) [+] You decide which particular Applications should be getting a new IP (in the contrary to OpenVPN where ALL Traffic is going through the VPN)
[-] No Traffic Encryption (atleast not by default, read down to the bottom of this article to learn how to encrypt traffic) [-] Not really applicable and reliable for Torrenting purposes [-] Not all Applications support a Proxy option [-] IP is only changing where the proxy is set
Example how to set it to Firefox Browser go to Tools -> Options -> Advanced -> Network -> Settings -> Manual Proxy Configuration Http-Proxy: uXXXXX.nvpn.to (uXXXXX.nvpn.to you will find this in your .ovpn config file) Port: 3128 Username: Your VPN username Password: Your VPN password Tick "Use this proxy server for all Protocols"
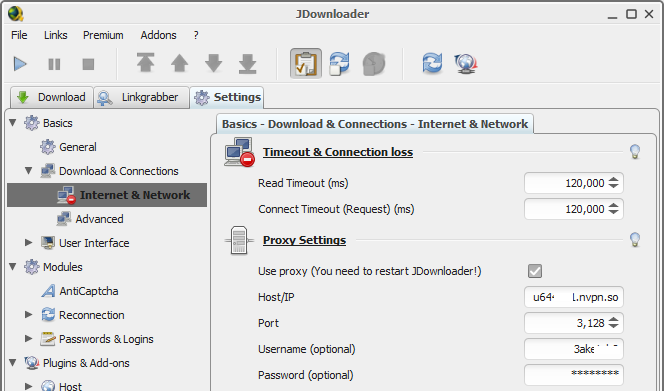
- How to use it with jDownloader ( http://jdownloader.org/ )
Host/IP: Your VPN hostname (uXXXXX.nvpn.to you can find this in your .ovpn config file) Port: 3128 Username: Your VPN username Password: Your VPN password
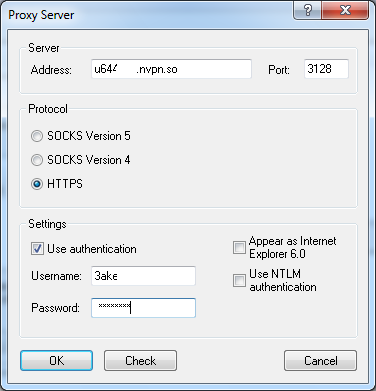
- How to use it with Proxifier (http://www.proxifier.com/)
Addres: Your VPN hostname (uXXXXX.nvpn.to you can find this in your .ovpn config file) Port: 3128 Protocol: HTTPS Username: Your VPN username Password: Your VPN password
- How to Encrypt the SQUID Traffic
1. You need the program "stunnel" Choose the newest version for your platform and download it. 2. We need to do some changes now in the "stunnel" config file, start stunnel and right click its icon located in the taskbar, go to "Edit Configuration" and place following into the file:
[nvpn-squid] accept = 127.0.0.1:3128
After clicking the link (its possible you need to log in first) inside the members area you will find a new Download link for your "stunnel.conf" file! (This generated config file is ready to go for both proxies, Squid + Socks5) 3. IMPORTANT: After editing the file it needs to be reloaded, right click on the stunnel icon and click on "Reload stunnel.conf" 4. To later verify your data flow you can click on "Show Log Window" now too. 5. Start your prefered browser now. In our example we use Firefox Browser go to Tools -> Options -> Advanced -> Network -> Settings -> Manual Proxy Configuration Http-Proxy: 127.0.0.1 Tick "Use this proxy server for all Protocols" 6. Click on OK in Firefox and start browsing, the traffic flow is now encrypted with SSL. To verify data flow being encrypted have a look at the stunnel -> Show Log Window and you will notice messages similar to the ones below: | |
|
|


