|
How to Setup with Merlin (Asus based Firmware)?
Posted by Max Biggavelli on 03 January 2016 07:07
|
|
|
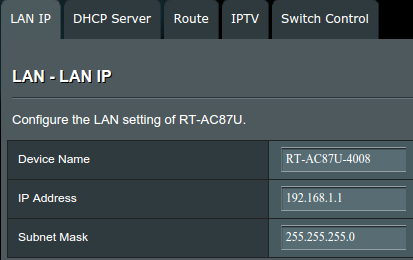
Hi guys, as i wrote the previous DD-WRT tutorial, i was happy to get my line covered. But now i am on VDSL 50/10 and i want more speed and something new to work on ;-) This tutorial is made with a Asus RT-87U Router. I decided to buy this one because of a few reasons. Good performance as you can see here and two separate DualCores for each Wifi (which are not as used as good in DD-WRT)! O/C function, alternative Firmware from Merlin, which is based on the original one and etc. Merlin is common for Asus, but there are a few developers, who port it to other routers as well. So here we are now. At the end you are able to choose which client should use which Gateway (WAN/VPN) for which URL, or all, or nothing Furthermore you are able to connect to all devices in your whole network, if you are connected to the Merlin Router. VPN gives me 45mbit down, parallel 6mbit up. >>>>>>>>>>>>>>>>>>>>>>>>>>>>>>>>>>>>>>>><<<<<<<<<<<<<<<<<<<<<<<<<<<<< Router 1 (LAN Port) - Router 2 (WAN Port) Router 1: Fritzbox 7170 for ISP connection, used in Router mode on VDSl 50/10 Router 2 (VPN Router): ASUS RT-87U, Merlin 380.57
>>>>>>>>>>>>>>>>>>>>>>>>>>>>>>>>>>>>>>>><<<<<<<<<<<<<<<<<<<<<<<<<<<<<
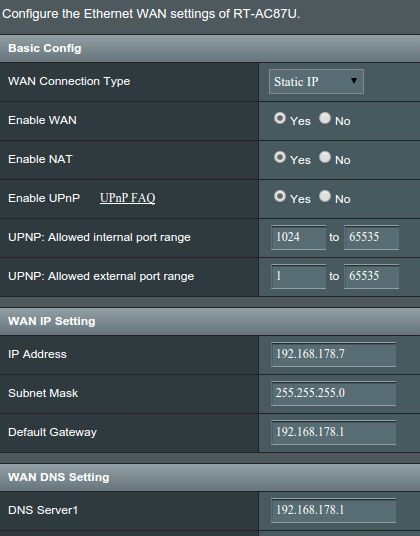
1) WAN internet connection automatic or static, i use Static, go to WAN tab:
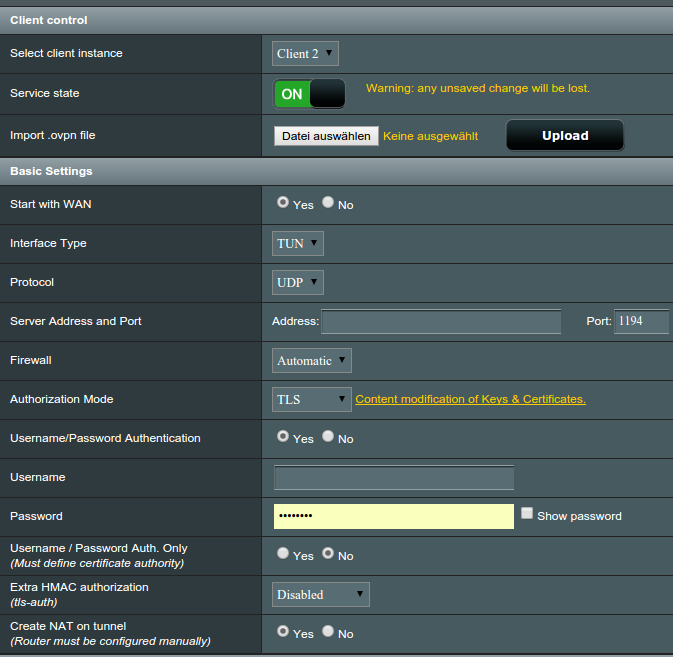
2) VPN Client, go to VPN / OpenVPN clients Do not play around with other client tabs! I have spent a whole day, because of testing vpn on client 1, at least i use client 2, but the playing around on client 1 had blocked my WAN port, inspite of having this client disabled! Client control / Basic Settings In my case, select instance Client 2 (it means tun12 later on). Now browse to your openvpn (YourUsername.ovpn) file and upload it. Select "Start with WAN". Protocol UDP or TCP, Fill in Username / Password. Choose Authorization Mode to TLS and click on "Content ..." next to TLS. Put in your complete NVPN cert in "certificate authority" and click SAVE
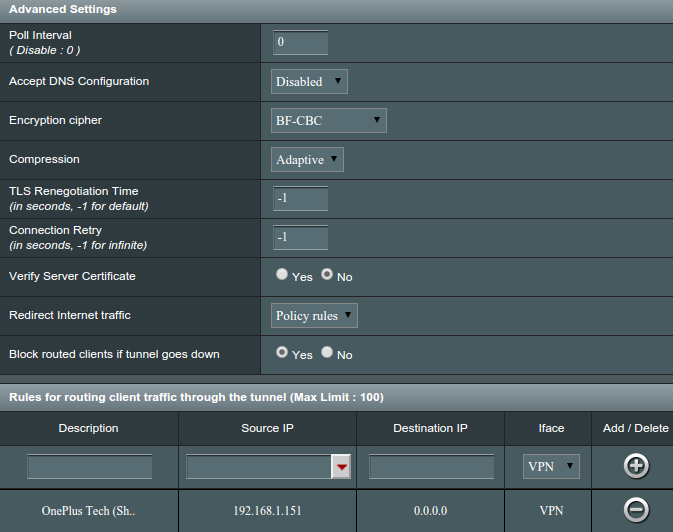
- choose your Encryption cipher (you can find this inside your YourUsername.ovpn file, if unsure) but usually it is "AES-256-CBC"
Clients which are not mentioned use WAN / ISP IP. If you want all your clients o be routed to the VPN use (in my network) 192.168.1.0/24 - 0.0.0.0 Destination IP could also be used with a single IP, or entire IP range. Click APPLY - your service state should be green, otherwise check in the system log in this section. Check on http://check.nvpn.net whether you are successfully connected to the VPN, as in my example my phone is (192.168.1.151), or if you are on WAN (in my case all other devices).
How to get to the Asus subnet, if you are connected to the ISP Router (not to the Merlin one), means your PC is in subnet 192.168.178.x? "System Log - Port Forwarding" should show you now the preroutings via nat-start (if you have such) and the vserver routings which you have added in the last few lines!
If you want your devices to be "connectable", then you have to put in some iptables rules in order to get this working. In my case my NAS (192.168.1.99) is behind my router and i want to connect to this via tunnel, or maybe it should be connectable for BT (TCP). Go to Adminstration / System
Apply & Reboot! Now connect via ssh and go to /jffs/scripts/ Save a script named "nat-start" with your ports(s), xxxx and IPs:
I overclocked the asus to 1200/800, ssh:
Have a look a settings guide for your Router, for myself i found one for best Wifi etc. settings. Turn everything off, which is not needed, WPS … Save your settings and backup JFFS partition. Good luck!
Thanks to our member netguru for the text tutorial! | |
|
|


