Knowledgebase
How to use our WireGuard
Posted by Max Biggavelli on 11 December 2019 03:28

Update 16.12.2019: Our WireGuard implementation goes live, but first things first, there are some important things to know which we will further below but some light on.

What is WireGuard?

Simply put, Wireguard is an experimental VPN protocol that is supposed to offer a more simple (partly faster, not not necessarily) and more secure option than current protocols. There are some major differences between OpenVPN (the industry gold standard) and WireGuard.

It promises to be faster and leaner than OpenVPN and IKEv2, widely viewed as the two best protocols available today. WireGuard has already delivered positive results during testing, with significantly lower ping times (a measure of overall network speed) and more stable connections than OpenVPN.

Advantages

  1. Updated encryption techniques – While the industry standard is typically AES-256, the founder of WireGuard felt that the encryption was outdated. Instead, it uses a number of different methods including ChaCha20, BLAKE2s, Curve25519, SipHash24, and HKDF. Those are allegedly better options and you can read more about them on their website if you wish to.

    WireGuard uses the following protocols and primitives, as described on its website:

    You can learn more about WireGuard’s modern cryptography on the official website or in the technical white paper.

  2. Simple and minimalized code base – Instead of using around 600.000 lines of code, WireGuard only uses about ~4000 lines of code. That makes it light and manageable.

    This is in stark contrast to OpenVPN and OpenSSL, which combined have around 600,000 lines. IPSec is also bulky at around 400,000 total lines with XFRM and StrongSwan together.

    What are the advantages of a smaller code base?

    1. It is much easier to audit. OpenVPN would take a large team many days to audit. One person can read through WireGuard’s codebase in a few hours.
    2. Easier to audit = easier to find vulnerabilities, which helps keep WireGuard secure
    3. Much smaller attack surface in comparison to OpenVPN and IPSec
    4. Better performance
  3. Cross-platform ease – Because WG uses public keys instead of certificates like OpenVPN does, it should work well across all platforms. WireGuard supports Mac OS, Android, iOS, and Linux, with Windows support still in development.

Disadvantages

  1. New and untested – Despite the advantages we mentioned, WG has no proven track record. OpenVPN, of course, does. It was originally released in 2001 and has gone through a number of major audits by OSTIF.

  2. Still in heavy development – Unfortunately, WG is not even remotely close to be final, or anywhere near production ready and we can confirm this.

    It must be pointed out that WireGuard is not complete, it has not passed a security audit, and the developers explicitly warn about trusting the current code:

    WireGuard is not yet complete. You should not rely on this code. It has not undergone proper degrees of security auditing and the protocol is still subject to change. We’re working toward a stable 1.0 release, but that time has not yet come.

WireGuard is not yet complete. You should not rely on this code. It has not undergone proper degrees of security auditing and the protocol is still subject to change. We’re working toward a stable 1.0 release, but that time has not yet come.


Quickjumps: Windows | Mac OS | Android | iOS | Linux


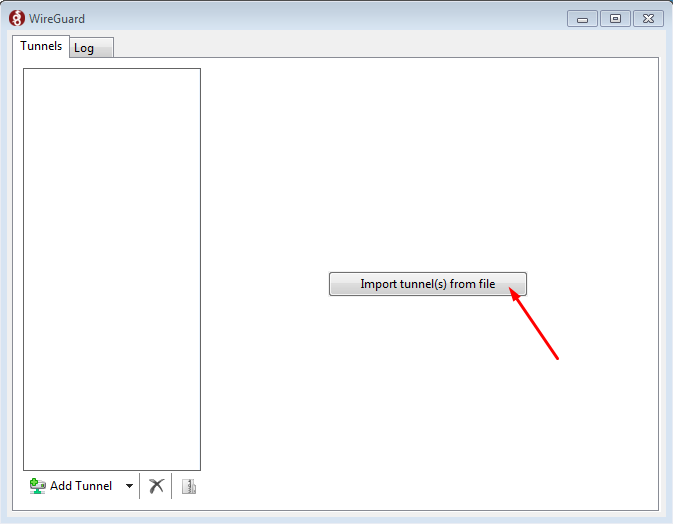
Windows Vista/7/8/10 Certificate setup procedure

1. Install the WireGuard client from here: https://www.wireguard.com/install/

2. Secondly you will need to log into the members area now https://nvpn.net/memberss/ - its really important being logged into the members area first!

(Incase the login mask for the members area keeps reloading, make sure to copy & paste in your Username and Password rather quickly into the login fields, the Captcha is pretty quick to disallow members area login).

Once successfully logged into the members area, now visit the following link: https://nvpn.net/memberss/wg.php

Now you will find a Download link for the "nvpn-wireguard-config" file, click on it and choose "Save" so that it will download the required "uXXXXX.conf" file to your computer.

3. Start the WireGuard software now and click on the "Import tunnel(s) from file" button and choose your previously downloaded "uXXXXX.conf" file:

https://nvpn.net/images/wg1.png

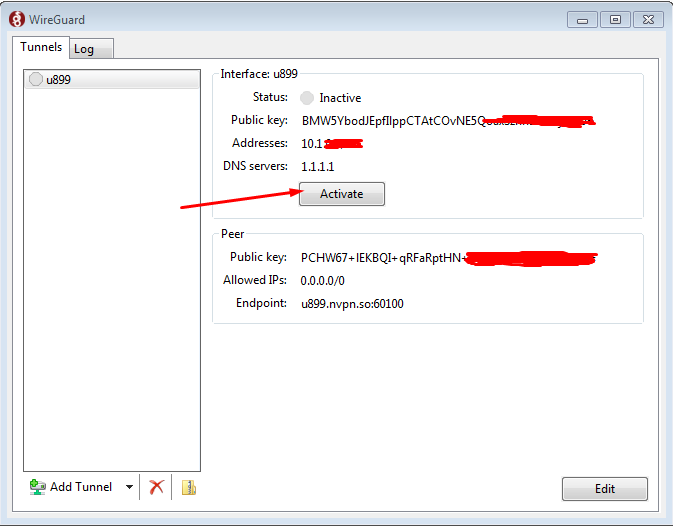
 4. Now click on "Activate" button:

https://nvpn.net/images/wg2.png

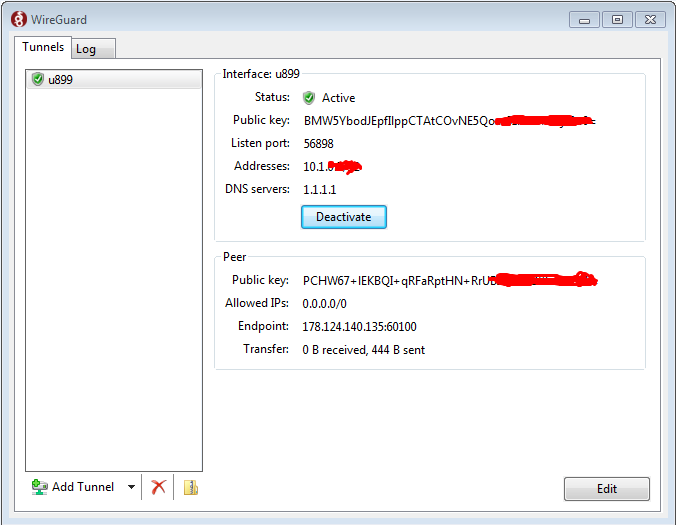
5. Once connected it will look as follows:

https://nvpn.net/images/wg3.png

(32 vote(s))
Helpful
Not helpful